
Drones - Obstacle detection
Newsletter
Latest articles

Drones may only be flown in residential areas under strict conditions. The most important rules are:
- Drones weighing over 250g or equipped with a camera require the permission of the landowner.
- Maximum permitted flight altitude: 120 meters.
- Drones must always remain within visual range.
- Registration with the Federal Aviation Office (LBA) is mandatory for drones weighing over 250 g or equipped with a camera.
- Liability insurance is mandatory for all drone flights.
Violations can result in fines of up to €50,000 or even imprisonment. Those who want to fly safely should comply with all regulations and avoid sensitive areas such as crowds or no-fly zones.
Tip: Check the DIPUL map or a drone app before every flight to avoid no-fly zones.
Drone laws 2025: All rules for drone pilots for DJI Mini 4 Pro, DJI Mini 4K & Neo etc.
sbb-itb-d7de319
Drone laws in Germany
The legal framework for drone flights in Germany is based on a two-tier system: EU Regulation 2019/947 of the European Union Aviation Safety Agency (EASA) provides the general framework, while the German Air Traffic Regulations (LuftVO), in particular Section 21h, stipulate additional national rules. The following sections explain the EU-wide provisions and the specific German regulations in more detail.
EU Drone Regulation
The EU regulation categorizes drone flights into three risk categories: Open (low risk, no permit required), Specific (medium risk, permit required), and Certified (high risk, certification required). For residential areas, the Open category is particularly relevant, which is further divided into three subcategories:
- Category A1: Drones weighing less than 250 g (C0) or less than 900 g (C1) are permitted to fly over populated areas. Flying over uninvolved persons must be avoided. Intentionally flying over crowds of people is prohibited.
- Category A2: Drones up to 4 kg (C2) may be operated in residential areas with a minimum horizontal distance of 30 m to people. In slow flight mode, a distance of 5 m is sufficient. An A2 remote pilot certificate is required.
- Category A3: For drones up to 25 kg (C3/C4), a minimum distance of 150 m to residential, commercial or industrial areas applies.
Additionally, the Open category has a maximum flight altitude of 120 meters above ground level. Drones weighing over 250 grams or equipped with a camera must be registered with the German Federal Aviation Office (LBA). Registration costs are €20 for private individuals and €50 for legal entities. The electronic operator ID (e-ID) must be visibly displayed on the drone. Since January 1, 2024, drones in classes C1, C2, and C3 must also transmit a remote ID.
German national laws and restrictions
Germany supplements EU regulations with stricter national rules, particularly regarding the protection of privacy and residential areas. According to Section 21h of the German Air Traffic Regulations (LuftVO), drones weighing over 250g or equipped with cameras may not fly over residential properties without explicit permission. This regulation goes beyond EU requirements and protects the rights of property owners.
Another important regulation is the general insurance requirement for drone flights. According to the German Air Traffic Act (LuftVG §37), liability insurance is mandatory, regardless of the drone's weight or purpose. Annual premiums for hobby pilots typically range from €30 to €100.
The minimum age for independent drone flights is 16. Furthermore, safety distances of approximately 100 meters must be maintained from federal highways, railway lines, power plants, hospitals, and nature reserves. These additional regulations underscore Germany's efforts to ensure the safe and responsible operation of drones.
Requirements for drone flights in residential areas
Drone weight classes and regulations for residential areas in Germany
Drone weight classes and permits
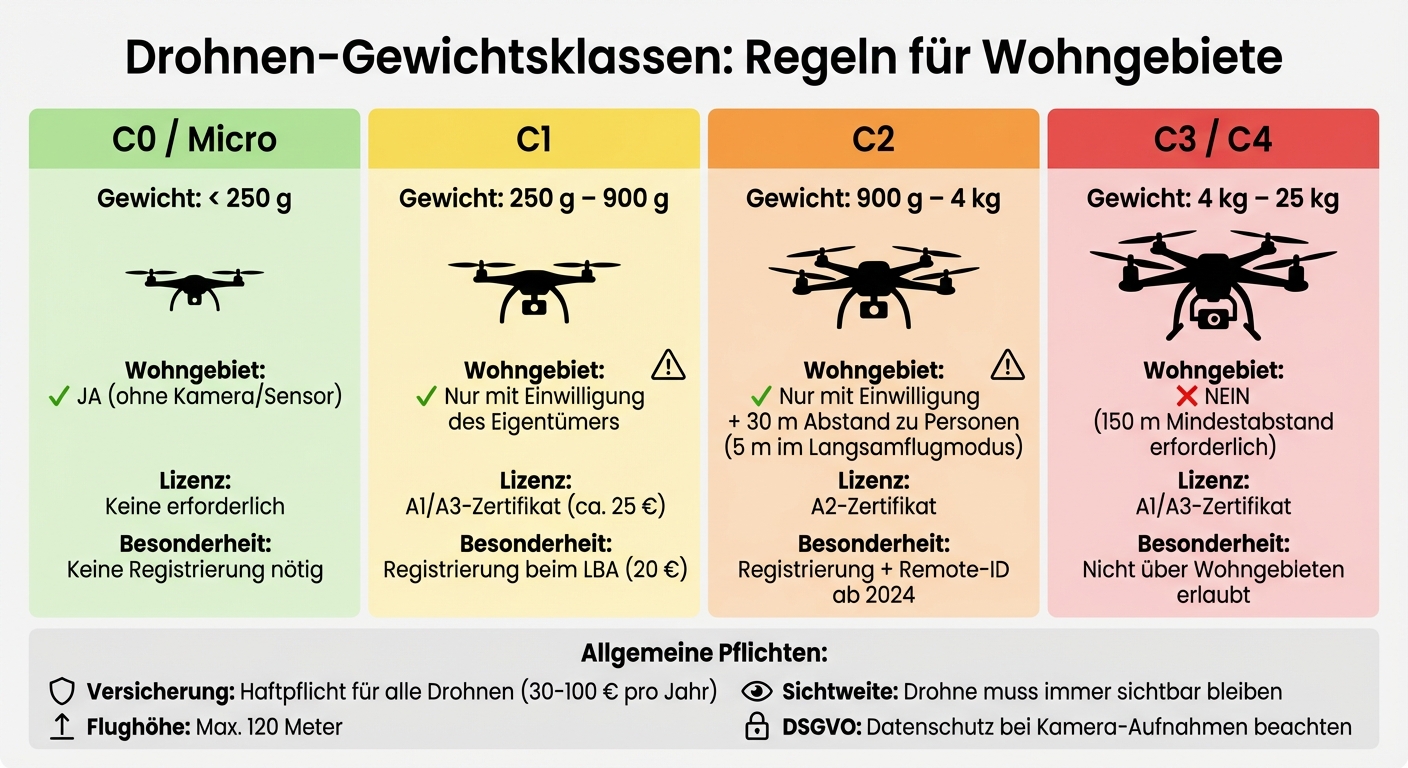
The weight of a drone plays a crucial role when it comes to flights over residential areas. Drones under 250g without a camera or sensors are generally permitted to fly over residential properties without major restrictions. However, as soon as a camera is installed or the weight exceeds 250g, stricter regulations apply.
For drones weighing between 250g and 900g (Class C1), the landowner's permission is required. Pilots must also present the EU A1/A3 competency certificate, which can be purchased online for approximately €25. Even stricter requirements apply to drones up to 4kg (Class C2): a horizontal distance of at least 30 meters to uninvolved persons is mandatory, which can be reduced to 5 meters in slow-flight mode. An A2 remote pilot certificate is also required.
| Drone class | Weight | Residential area permitted? | Required license |
|---|---|---|---|
| C0 / Micro | < 250 g |
Yes (without camera/sensor) |
No |
| C1 | 250 g – 900 g | Only with consent | A1/A3 certificate |
| C2 | 900 g – 4 kg | Only with consent + 30 m distance | A2 certificate |
| C3 / C4 | 4 kg – 25 kg | No (150 m distance required) | A1/A3 certificate |
These regulations are essential to making drone flights in residential areas legal and safe.
Consent and data protection rules
Drones with cameras that exceed the aforementioned weight classes are prohibited from flying over residential properties without the express consent of the owner or resident. This rule protects privacy and the right to informational self-determination. As technology expert Mateusz Kaczmarek explains:
"It is illegal to fly over residential private property with a camera-equipped drone >0.25kg without the owner's consent."
Additionally, the GDPR applies to drone footage. If people, license plates, or private areas are recognizably filmed, a legal basis for data processing must exist. Alternatively, the recordings must be anonymized before publication. Secretly recording private conversations with drones is a criminal offense and constitutes a violation of the regulations on acoustic surveillance.
Registration, insurance and licenses
In addition to weight and consent requirements, drone operators have further obligations. In Germany, liability insurance is mandatory for all drones, regardless of weight. The cost for hobby pilots ranges from €30 to €100 per year. Operator registration with the Federal Aviation Office (LBA) is also required. The resulting e-ID must be permanently and clearly affixed to the drone.
Since January 1, 2024, a new regulation has been in effect: drones in classes C1, C2, and C3 must transmit a remote ID so that authorities can identify the operator during flight. These measures, combined with the weight class regulations, help to ensure safety and privacy in residential areas.
Fines and penalties for violations
Common violations and fine amounts
Drone flights that violate regulations can be very expensive. Serious offenses can result in fines of up to €50,000. If you fly without the necessary EU certification (A1/A3 or A2), you face fines of up to €1,000. Failure to have the required liability insurance can cost up to €5,000. Flying over crowds without permission is particularly risky – fines of up to €5,000 are also possible. And flying in no-fly zones such as airports, nature reserves, or industrial sites is especially dangerous, with fines of up to €50,000.
In addition to fines, serious violations can also lead to criminal prosecution. Endangering air traffic is punishable under Section 315 of the German Criminal Code (StGB) by imprisonment for six months to ten years. Unauthorized entry into restricted airspace (ED-R) is also a criminal offense. Data protection violations, such as secretly filming people or property without consent, can be punished with up to two years' imprisonment under Section 201a of the German Criminal Code (StGB). GDPR violations could theoretically even result in fines of up to €20,000,000.
| Type of offense | Legal basis | Maximum penalty |
|---|---|---|
| Flight into a no-fly zone | Air Regulations / EU 2019/947 | €50,000 fine |
| Missing drone insurance | Air Traffic Act | €5,000 fine |
| Missing license (A1/A3 or A2) | Air Regulations | €1,000 fine |
| Missing operator registration | Air Regulations | €500 fine |
| Flight over crowds of people | Air Regulations | €5,000 fine |
| Data protection breach (recordings) | Section 201a of the German Criminal Code | 2 years imprisonment or a fine |
| Dangerous air traffic disruption | Section 315 of the German Criminal Code | 6 months to 10 years imprisonment |
In particularly serious cases, the police or the Federal Aviation Office can confiscate your drone directly. Those who follow the regulations will avoid this trouble – and protect others.
This is how you stay compliant with the rules.
Adhering to the rules is not only important to avoid fines, but also ensures greater safety. Before taking off, you should always check the geofences. Helpful tools for this are the DIPUL map (Digital Platform for Unmanned Aviation) or the Droniq app. These show you current no-fly zones and temporary restrictions (NOTAMs). You should also maintain a distance of at least 100 meters from sensitive areas such as highways, railway lines, hospitals, or power plants.
Don't forget to have the necessary documents with you on every flight: the EU Certificate of Competence (A1/A3 or A2), the operator registration (e-ID), and proof of insurance. It's also important that the e-ID is clearly visible and permanently attached to the drone. Your liability insurance must specifically cover drone flights.
If you fly over residential areas, you need the explicit permission of the property owner – at least if your drone weighs more than 250g or has a camera. Also, adhere to the maximum permitted flight altitude of 120 meters and ensure that the drone always remains within your line of sight. A flashing green light is required for night flights.
What should I do if a drone flies over my property?
Rights of landowners
If a drone flies over your property without permission, you have rights that protect you. The airspace above your property, up to a certain altitude, belongs to you. German law, in combination with the GDPR, protects you from unauthorized aerial photography. Specifically, drones with cameras and weighing more than 0.25 kg are not allowed to fly over your residential property without your explicit consent (§21h LuftVO).
Drone footage showing private spaces such as windows or fenced gardens violates Section 201a of the German Criminal Code (StGB). Images in which you or your license plate are recognizable also fall under the protection of the GDPR. In these cases, the drone pilot must have a legal basis for taking the footage.
Steps to take in case of unauthorized drone flights
If you notice a drone flying over your property, it's important to remain calm and act thoughtfully. If the pilot is nearby, speak to them. Often, they are unaware that they are breaking rules or infringing on your privacy. Politely ask them to end the flight and, if necessary, delete any recordings.
Additionally, you should document the location, time, and flight behavior of the drone. This information can be helpful if legal action is taken. You can use the DIPUL map to check no-fly zones.
If the drone is flying dangerously or you feel harassed, contact the local police. In case of violations of aviation regulations, you can also contact the Federal Aviation Office. Important: Do not be tempted to shoot down or damage the drone – this could be considered property damage and have legal consequences. In case of repeated incidents, you can take legal action as described in the next section.
Legal action and height regulations
Should the problem occur frequently, careful documentation and contacting the relevant authorities are crucial. A lawyer can send a cease and desist letter to the drone pilot to prevent further overflights. In cases of serious violations of data protection or personal rights, civil action can also be taken.
Stricter rules often apply in controlled airspace, such as near airports. Here, the permitted flight altitude may be limited to 50 meters or less. In rare cases, shooting down drones has been legally recognized as self-defense, but such measures are highly controversial and should only be considered as a last resort.
Conclusion
In Germany, drone flights are permitted in residential areas as long as certain rules are followed. Those who know and adhere to these regulations can operate their drones safely and legally. The most important requirements include: registration with the Federal Aviation Office (LBA) for drones weighing over 250g or equipped with a camera (cost: €20 for private individuals), liability insurance (from €30 per year), and the EU A1/A3 certificate of competence for drones weighing 250g or more (approximately €25). These points form the basis for safe drone operation in urban areas.
In residential areas, drones with cameras weighing 250g or more always require the permission of the property owner. Furthermore, the maximum flight altitude of 120 meters must not be exceeded, and the drone must remain within direct line of sight at all times. Check the DIPUL map before each flight to ensure you do not fly over no-fly zones such as airports (minimum distance: 1.5 km) or hospitals.
Anyone who violates the regulations risks hefty fines: these can reach up to €50,000. Without insurance, you are personally liable for all damages caused. Make sure your e-ID is clearly visible on your drone and always carry your registration confirmation, proof of insurance, and proof of competence with you. This will not only help you avoid fines but also contribute to respectful and safe airspace management.
With careful preparation and consideration for privacy and safety, nothing stands in the way of a smooth drone flight. These regulations strike a balance between protecting privacy and the enjoyment of flying drones.
FAQs
Does the consent also apply to tenants?
Permission to use drones generally also applies to tenants. However, the owner or the person using the property bears the responsibility for operating the drone. All legal requirements and data protection regulations must be strictly observed.
What counts as a "crowd of people"?
In Germany, a group of people not directly involved in the drone flight is referred to as a crowd. When operating a drone, a minimum horizontal distance of 30 meters must be maintained from these uninvolved persons.
Which drones need remote ID?
Since 2024, an important change has been in effect for drones of classes C1, C2, and C3. According to the EU drone regulation, these drones must be equipped with a so-called remote ID.
The remote ID allows the drone to be uniquely identified during flight. The aim of this regulation is to increase airspace safety while simultaneously facilitating the monitoring and tracking of drone activity.

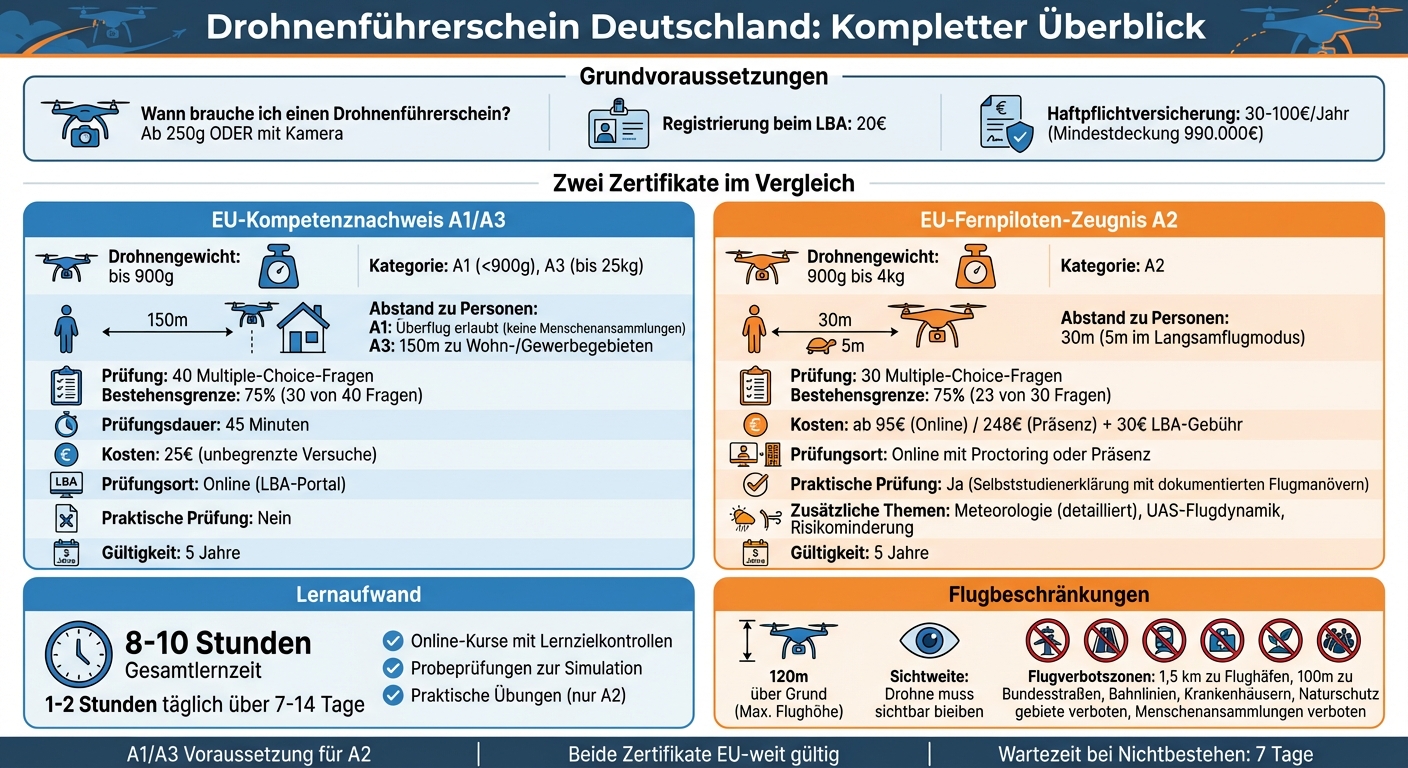
Since 2021, a drone pilot's license is required in Germany for drones weighing 250g or more, or those equipped with a camera. There are two certificates: the EU Certificate of Competence (A1/A3) for low-risk flights and the EU Remote Pilot Certificate (A2) for flights closer to people. Both licenses are valid for five years and require passing an exam with at least 75% correct answers.
Key facts:
- Mandatory: Drones weighing 250g or more, or equipped with a camera.
- Categories: A1/A3 (up to 900 g, safe distance), A2 (up to 4 kg, closer to people).
- Costs: Registration with the LBA (€20), A1/A3 exam (€25), A2 exam (from €95).
- Insurance: Liability insurance is required.
- Preparation: Online courses and practice tests (8–10 hours of study time).
With structured preparation and the right materials, the exam is quite manageable.
Drone license A1/A3 vs A2 comparison - costs, requirements and categories
Legal requirements for a drone pilot's license
EU drone regulation explained
EU regulations 2019/947 and 2019/945 classify drone flights into three risk categories: "Open", "Specific", and "Certified". For hobby pilots, the open category is crucial. This is further subdivided into three subcategories:
- A1: Applies to drones under 900g. Occasional overflights over uninvolved persons are permitted, but not over crowds of people.
- A2: Covers drones up to 4 kg. A safety distance of at least 30 m to people must be maintained. In slow flight mode, the distance is reduced to 5 m.
- A3: For drones up to 25 kg. A distance of at least 150 m to residential, commercial or industrial areas must be maintained.
As soon as a drone has a camera or weighs more than 250g, registration with the German Federal Aviation Office (LBA) and the EU A1/A3 competency certificate are mandatory. Those who wish to fly closer to people and use a drone weighing between 900g and 4kg additionally require the EU A2 remote aviation pilot certificate. The maximum flight altitude in the open category is 120m above ground level, and the pilot must always keep the drone within direct line of sight. These regulations form an important part of the exam questions and are therefore essential for preparation.
Registration with the Federal Aviation Office (LBA)
Registration with the German Federal Aviation Office (LBA) is mandatory for all drones weighing 250g or more, or equipped with a camera – regardless of whether they are used privately or commercially. Registration is done online and costs:
- €20.00 for private individuals
- €50.00 for legal entities
After successful registration, you will receive an electronic operator ID (e-ID), which must be clearly visible and permanently attached to each drone.
The following documents are required for registration:
- A scan of a valid identity card or passport (in PNG, JPG or PDF format)
- Details of liability insurance (insurer and policy number)
Processing takes approximately one hour with complete documentation. If a manual review is required, it can take up to 14 business days. For pilots under 16 years of age, a legal guardian must complete the application.
Required legal obligations
In Germany, liability insurance is legally required for all drones. The minimum coverage amount is 750,000 units of account, which corresponds to approximately €990,000. Since many private liability insurance policies do not cover drone flights, special aviation liability insurance is often necessary. The cost for this typically ranges from €30 to €100 per year for hobby pilots.
In addition, strict no-fly zones apply. These include:
- A safety distance of 1.5 km from airport boundaries
- 100 m distance to federal highways, railway lines and hospitals
- Bans on nature reserves and gatherings of people
To identify these zones, tools such as the Digital Platform for Unmanned Aviation (dipul.de) or the DFS drone app can be used. Furthermore, flights with camera drones weighing over 250g over private residential property require the explicit consent of the owner. Otherwise, violations of data protection law may occur.
With this basic legal knowledge, you are ideally prepared to tackle the exam content in a targeted manner.
sbb-itb-d7de319
EU Drone License: Tips for the exam | quick, easy, free
What the exam covers
The drone pilot's license exam consists of 40 multiple-choice questions for the A1/A3 competency certificate and 30 questions for the A2 remote pilot certificate. To pass, you must answer at least 75% of the questions correctly. The exam content is designed to ensure you can fly safely and legally. Here's an overview of the key topics.
Air law and regulations
A large part of the exam revolves around the legal and practical aspects of drone flying. The focus is primarily on EU and German aviation law. You need to know where no-fly zones are located, what altitude restrictions apply, and what distances must be maintained. Data protection issues also play an important role: In Germany, for example, it is forbidden to record faces or license plates without consent. Additionally, topics such as airspace structure and insurance requirements are covered.
Meteorology for drone pilots
Weather has a huge impact on drone flights, so your meteorological knowledge will also be tested. The A1/A3 competency certificate only covers the basics. The A2 certificate, however, requires you to delve deeper. You'll learn how wind, visibility, and air density affect flight stability and battery life, and how to correctly interpret weather reports. You'll also be tested on your ability to assess weather conditions to fly safely even in more challenging circumstances.
Flight operations and navigation
This section covers the technical aspects of your drone. This includes GPS navigation, "Return to Home" functions, and geo-awareness systems. You will also be asked about checklists, emergency procedures, and risk management. For the A2 certificate, you must additionally demonstrate knowledge of flight dynamics and performance limits to safely control heavier drones up to 4 kg.
| Exam topic | A1/A3 exam | A2 exam | Relevance |
|---|---|---|---|
| Meteorology | Basics only | Detailed | Affects stability and visibility |
| UAS flight dynamics | No | Yes | Understanding the limits of drones |
| Operating procedures | Yes | Yes | Standardized security checks |
| Risk reduction | No | Yes | Technical measures for risk reduction |
| General UAS knowledge | Yes | No | Basic components and functions |
This is how you prepare for the exam
You don't need to plan for months of preparation. Most participants pass the exam with 8 to 10 hours of study, spread over 1–2 weeks. The key lies in a structured approach and the right materials. It's best to start with well-organized online courses.
Online training courses
For the A1/A3 course, the LBA offers an online course for €25.00, including unlimited exam attempts. You can retake the exam as often as necessary until you achieve the required 75%.
If you're aiming for the A2 long-distance pilot's license, there are e-learning courses that systematically prepare you for all exam topics. These courses take about 8 to 10 hours and include learning assessments at the end of each chapter to identify knowledge gaps early on.
"The learning assessments at the end of a chapter highlight potential knowledge gaps for the learner and offer the opportunity to revisit specific learning content." – Droniq
Practice exams for exam simulation
In addition to the courses, realistic test simulations and a clear schedule will help you prepare optimally. Practice exams are particularly helpful, as they replicate the actual exam situation with multiple-choice questions and a time limit. For the A1/A3 exam, for example, you have 45 minutes to answer 40 questions.
The LBA also offers a practice exam with 20 questions, which you must pass before you are admitted to the final exam. This allows you to familiarize yourself with the format and specifically address any weaknesses.
Learning plan and timetable
An effective study plan for the A2 exam could look like this: 1 to 2 hours daily over a period of 7 to 14 days. Start with the basics from the A1/A3 course and gradually work your way up to the more challenging A2 topics.
Don't forget to schedule time for practical exercises. These include flight maneuvers such as hovering, coordinated turns, and emergency procedures, which you must document. If you are taking the exam online using proctoring software, make sure you install Google Chrome and the Proctorio extension in time.
Learning materials and resources
In addition to structured exam preparation, these resources offer the necessary theoretical and practical knowledge to be optimally prepared.
The official training materials from the authorities provide an excellent foundation for optimal exam results. One example is the LBA OpenUAV portal (lba-openuav.de), which offers modular training courses specifically for the "Open" category. Developed in cooperation with AIRCADEMY, these courses cover topics such as air law, operating procedures, and UAS classification. A particularly useful feature is the inclusion of practice exercises at the end of each module, which can be repeated as often as needed to reinforce the knowledge. These online training courses perfectly complement the official courses offered by the LBA and TÜV Rheinland.
Official LBA and TÜV Rheinland courses
As already mentioned, the LBA course for the A1/A3 certificate costs €25.00 and offers practical tools such as the “UAS Flight Checklist” for pre-flight checks and the “I'M SAFE” checklist for self-assessment of your fitness to fly.
For the A2 long-distance pilot certificate, Droniq, an LBA-designated testing center (DE.PStf.035), offers various e-learning packages. The online exam including e-learning costs €95.00, while the in-person exam costs €248.00. The courses include learning progress checks after each chapter and a final test to simulate the exam. With over 4,500 successfully conducted training courses and exams, Droniq is one of the most experienced providers. The LBA charges an additional €30.00 for the initial issuance of the A2 certificate.
Piecarté drones for practice
Besides theory, practical experience is essential. Special training drones from Piecarté are an excellent choice for this. Practical flight experience is particularly crucial for the A2 certificate, as the LBA's self-study guide requires documented flight maneuvers such as hovering, coordinated turns, and emergency procedures. Entry-level drones in the €80.00 to €120.00 price range are ideal for completing your first flying lessons. Piecarté offers models that are easy to control, affordable, and perfectly suited for beginners. This allows you to gain the necessary flying experience in a stress-free environment before taking the exam.
Tips for passing the exam
In addition to the learning materials provided, these tips can help you to successfully pass your exam.
Identify and improve weaknesses
The official LBA training modules include learning objective checks at the end of each chapter to help you identify knowledge gaps. Use these tests to address weaknesses directly. Especially for the A2 certificate, you should focus on the three main topics: meteorology , UAS flight performance , and technical and operational risk mitigation . These areas are particularly important in the exam.
A common stumbling block is the multitude of abbreviations in the learning materials. It's best to create a list of technical terms and abbreviations early on to avoid confusion during the exam. Furthermore, it is legally required that you thoroughly read your drone's user manual. According to EU Regulation 2019/947:
"Every drone remote pilot [must be] familiar with the user manual provided by the manufacturer."
The LBA's practical self-study guide offers helpful guidance for the A2 exam. Here you'll find a list of flight maneuvers and scenarios, such as flying in unusual conditions, GPS failure, or people entering the flight zone. This checklist will help you specifically improve your practical skills.
Once you have optimized these areas, you can use the following strategies to specifically prepare for the exam.
Examination strategies
Once you've addressed your weaknesses, these strategies will help you pass the exam. The passing grade is 75% correct answers. You have approximately 1 to 1.5 minutes per question – so plan carefully to avoid running out of time.
For proctored online exams (A2 and STS), you need the Google Chrome browser and the Proctorio extension. Make sure you have a stable internet connection (at least 1 Mbps) and are in a quiet room. Before the exam starts, a 360-degree room scan will be performed using your webcam. The AI-powered monitoring reliably detects any attempts to cheat.
If you fail the exam, request detailed feedback to make targeted improvements. Also, be aware of the legally required waiting period of 7 days before you can retake the exam.
Conclusion
The path to obtaining a drone pilot's license in Germany is clearly regulated: Start with the A1/A3 certificate, which you can acquire via the LBA portal for €25.00. If necessary, you can supplement this with the A2 certificate. Both exams have a passing grade of 75% and are valid for 5 years. Don't forget to register with the LBA as an operator (cost: €20.00), as the e-ID is a prerequisite for operating your drone.
The official training modules and practice tests of the LBA (German Federal Aviation Office) provide an excellent foundation for your preparation. For practical exercises such as hovering, turns, or emergency procedures, it is recommended to train with a suitable drone. Also, check whether your drone has a C-class registration, as this determines the required license and the applicable separation distance rules.
Additionally, drone liability insurance is legally required and must not be omitted under any circumstances.
With careful preparation, the right materials, and sufficient practice, you'll be well-equipped to successfully complete the exam. This concise guide provides the ideal foundation for obtaining your drone pilot's license.
FAQs
What certificate do I need for my drone?
In Germany, you need the EU A1/A3 competency certificate if you fly a drone weighing between 250 and 500 grams, or for drones weighing between 2 and 25 kilograms. However, if your drone weighs between 500 grams and 2 kilograms, you also need the EU A2 remote pilot certificate. Which certificates you need depends on the drone's weight and the operating conditions.
Which drones are exempt from licensing and registration?
Drones do not require a license or registration if they weigh less than 250g and do not have a camera or sensors that collect personal data. This regulation applies in particular to toy drones or models that do not have data collection functions and is based on legal provisions.
How does the A2 exam work online with proctoring?
The A2 exam with proctoring is conducted as a secure online exam using AI-supported monitoring. A camera observes the participants' behavior to ensure that no cheating attempts are made. At the beginning of the exam, a reference image is taken to confirm the participants' identities. Direct human supervision is not required.

Are you wondering whether a mini drone or a GPS drone is better suited to you? Here's the short version:
- Mini drones are lightweight (under 250g), compact (fit in a jacket pocket), and do not require a drone license in the EU. A drone under 250g is perfect for travel, spontaneous shots, and beginners. However, they are less stable in windy conditions and have a shorter flight time.
- GPS drones are larger, heavier, and offer greater stability, advanced cameras, and intelligent features such as automated flight paths and obstacle avoidance. They are ideal for professionals and outdoor projects, but often require registration and a larger budget.
Quick Comparison
| Feature | Mini drones | GPS drones |
|---|---|---|
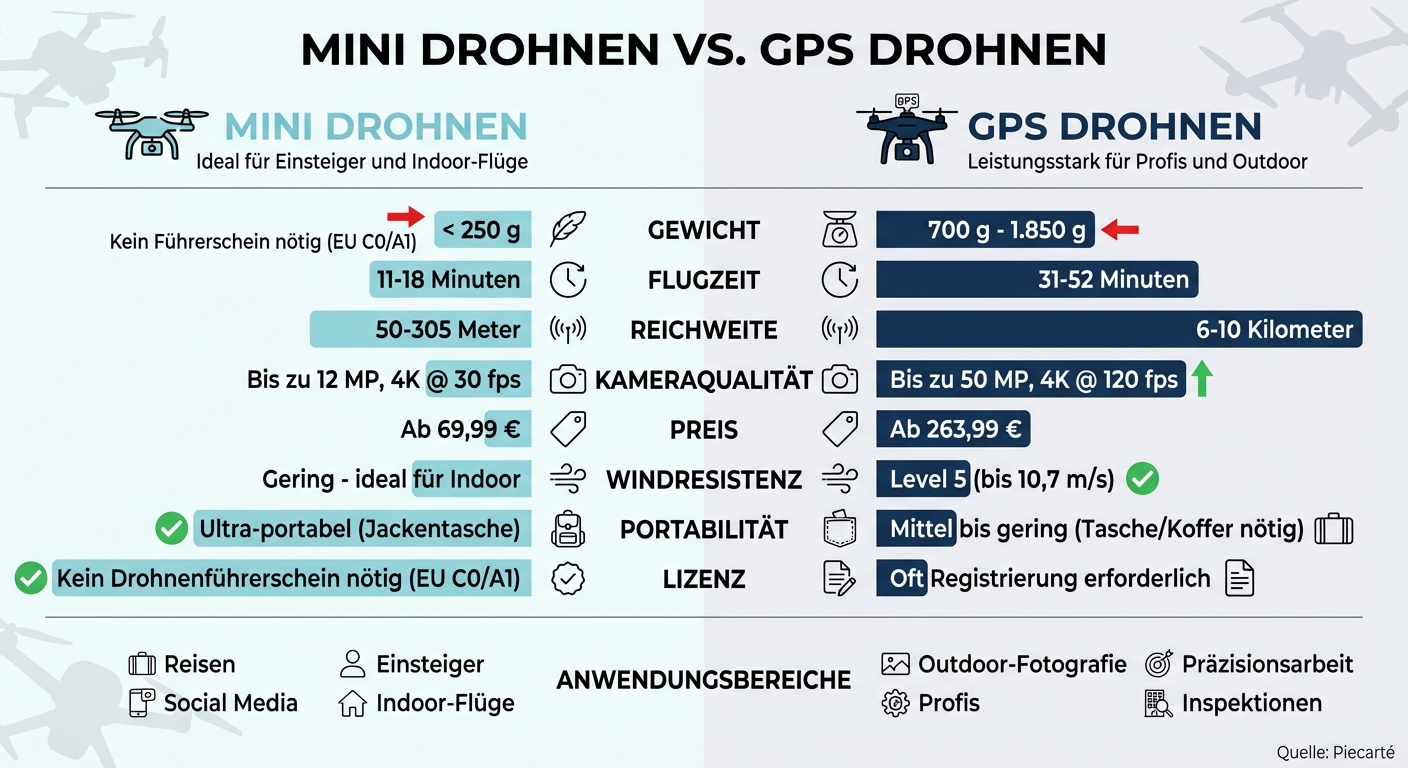
| Weight | < 250 g | 700 g – 1,850 g |
| Flight time | 11–18 minutes | 31–52 minutes |
| Reach | 50–305 meters | 6–10 kilometers |
| Camera quality | Up to 12 MP, 4K @ 30 fps | Up to 50 MP, 4K @ 120 fps |
| Price | From €69.99 | From €263.99 |
| Area of application | Travel, Social Media, Beginners | Outdoor, professionals, precision work |
If you want to fly easily and with minimal fuss, choose a mini drone. For demanding projects requiring stable footage, a GPS drone is the better choice.
Mini Drone vs. GPS Drone Comparison: Weight, Flight Time, Range, and Price
Size and portability differences
Mini drones: Small and lightweight
Mini drones are designed to weigh less than 249 g – a significant advantage. The DJI Mini 4K, for example, weighs only 246 g and measures just 138×81×58 mm when folded. Unfolded, it measures 245×289×56 mm.
"Takeoff whenever inspiration strikes. Weighing less than 249 g, Mini 4 Pro was designed for convenience on the go, and the drone's weight means there's no need for training or examinations in most countries and regions." – DJI
Thanks to their compact design, mini drones are extremely versatile, especially for travel. The DJI Mini 5 Pro also offers the advantage of tool-free propeller replacement, simplifying transport and maintenance. However, keep in mind that using a "Plus" battery for extended flight time will increase the drone's weight to over 249g. In this case, registration may be required. GPS drones, on the other hand, are more robustly built and offer greater wind resistance.
GPS drones: Larger and heavier design
GPS drones prioritize stability and robustness. The DJI Air 3, at 720 g, weighs almost three times as much as a mini drone. Professional models like the DJI Matrice 4D are even heavier, with a takeoff weight of 1,850 g, roughly seven times that of a mini drone. This additional mass provides better stability in windy conditions but limits portability.
While mini drones easily fit into a jacket pocket, GPS drones often require special cases. The DJI Matrice 4D, for example, measures 377.7 × 416.2 × 212.5 mm without propellers – far from a handy size. Therefore, such models are less suitable for frequent travelers or spontaneous use. The following table compares the most important differences between the drone models.
Size and weight comparison
| Drone model | Category | Starting weight | Dimensions (folded) | Portability |
|---|---|---|---|---|
| DJI Mini 4K | Mini drone | 246 g | 138×81×58 mm | Ultra-portable (jacket pocket) |
| DJI Mini 4 Pro | Mini drone | <249 g | 145×90×62 mm | Ultra-portable (jacket pocket) |
| DJI Air 3 | GPS drone | 720 g | Unspecified | Medium (small bag needed) |
| DJI Matrice 4D | GPS (Professional) | 1,850 g | 377.7×416.2×212.5 mm* | Low (hard case required) |
*Dimensions of the Matrice 4D without propellers.
These differences in size and weight will help you choose the right drone for your needs. Consider how important portability, functionality, and budget are to you to make an informed decision.
sbb-itb-d7de319
Flight stability and range
Mini drones: Limited stability and shorter range
Mini-drones without GPS are particularly susceptible to even light gusts of wind, often requiring manual intervention to maintain position. This can be a real challenge, especially for beginners. These models typically have a flight time of 11 to 18 minutes. Their range is also limited: many only manage 50 to 100 meters, and the Wi-Fi connection can be unreliable. Some achieve a maximum range of up to 305 meters. Due to these limitations, they are better suited for indoor flights or calm days. They are less suitable for demanding outdoor filming.
GPS drones: More stability and greater range
GPS drones rely on satellite systems such as GPS, GLONASS and Galileo, as well as an IMU (Inertial Measurement Unit), to remain stable even in windy conditions and to automatically maintain their position.
"The IMU (Inertial Measurement Unit) determines the drone's position and stabilizes its orientation in space – essential for automated flights." – Airteam
For example, modern models like the DJI Mini 4K can withstand wind speeds of up to 10.7 m/s (Level 5). Their flight time is typically 31 to 38 minutes, with high-end models like the DJI Mini 5 Pro even reaching up to 52 minutes. With advanced transmission systems like OcuSync, these drones achieve ranges of 6 to 10 kilometers. They also offer safety features such as Return-to-Home (RTH), which automatically returns the drone to its home base in case of low battery or signal loss.
Performance data comparison
| Feature | Mini drones (without GPS) | GPS drones |
|---|---|---|
| Flight time | approx. 11–18 minutes | approx. 31–38 minutes |
| Wind resistance | Lightweight – ideal for indoor use | Level 5 (up to 10.7 m/s) |
| Maximum range | 50–100 meters | 6–10 kilometers |
| Stability | Manual; prone to drift | Satellite-based; precise hovering |
| Security features | Basic (e.g. propeller protection) | Enhanced (RTH, obstacle detection) |
If you plan to fly outdoors, you should definitely check your drone's wind resistance. A rating of at least level 5 is advisable to maintain control. These stability and range characteristics play a crucial role in the camera and navigation functions, which we will examine in more detail in the next section.
Camera quality and navigation systems
Mini drones: Simple or no camera
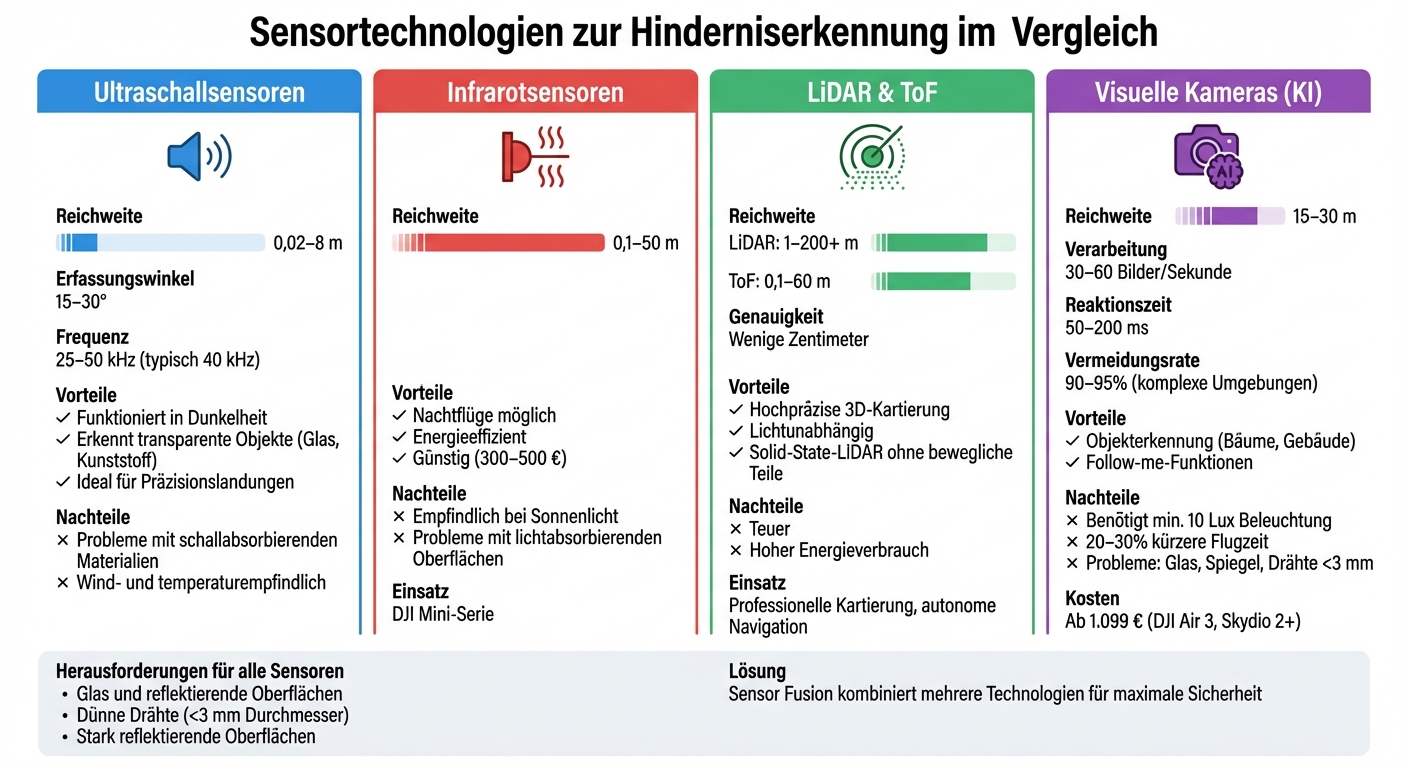
When choosing a drone, portability and flight stability aren't the only factors to consider; camera quality and navigation technology are equally important. Mini-drones often rely on smaller 1/2.3-inch sensors with 12 MP resolution, which are sufficient for occasional photos and videos. However, they struggle in low-light conditions. Video resolution is typically limited to 2.7K or 4K at 30 fps, with support for only standard color profiles. Navigation systems are frequently restricted to a downward-facing vision system, suitable only for hovering. Intelligent features like automated flight paths or obstacle avoidance are almost always absent. This might suffice for simple social media clips, but anyone planning more ambitious projects will quickly reach the limits of this technology. GPS drones offer significantly more possibilities.
GPS drones: Better cameras and intelligent features
GPS drones boast larger sensors, ranging from 1/1.3-inch to 1-inch CMOS, offering resolutions of up to 50 MP. These sensors provide approximately 64% more surface area than older models like the DJI Mini 5 Pro, resulting in improved dynamic range and reduced image noise. Videos can be recorded in 4K resolution at 100 fps or 120 fps for slow-motion footage. Furthermore, features like 10-bit D-Log M and HDR video at 60 fps enable extensive post-processing.
“The 1-inch sensor in the Mini 5 Pro is designed to deliver visibly better image quality and a wider dynamic range, especially in low light and high contrast.” – Dr. Gerd-Uwe Neukamp
In terms of navigation, GPS drones are equipped with advanced technology. Omnidirectional obstacle sensing and LiDAR technology ensure precise object detection, even in low-light conditions. Features such as waypoints for automated flight routes, ActiveTrack 360° for subject tracking, and an enhanced return-to-home function that can retrace the flight path even without a GPS signal are now standard. The Vision Assist function uses the obstacle sensors to provide a 360° all-around view – a significant advantage in confined or complex environments.
Camera and navigation comparison
| Feature | Simple mini drones (e.g. Mini 2 SE) | Advanced GPS drones (e.g. Mini 5 Pro) |
|---|---|---|
| Sensor size | 1/2.3-inch CMOS | 1/1.3-inch to 1-inch CMOS |
| Photo resolution | 12 MP | 48 MP to 50 MP |
| Max. Video | 2.7K @ 30 fps | 4K @ 120 fps |
| Obstacle detection | Only downwards | Omnidirectional + LiDAR |
| Navigation | Basic GPS/GNSS | Waypoints, ActiveTrack 360° |
| Color depth | 8-bit (standard) | 10-Bit D-Log M / HLG |
These technical differences make GPS drones the better choice for demanding projects. With a 90° rotating gimbal for vertical video and 10-bit color profiles like D-Log M or HLG, you can work professionally. And in complex environments, such as flying at dusk or in areas with many obstacles, omnidirectional sensors and LiDAR help with safe navigation and collision avoidance.
DJI Mini 2 SE, DJI Mini 4k, DJI Mini 3 Pro and DJI Mini 4 Pro in a comparison of drones under 250 grams

Prices at Piecarté
At Piecarté, you can get mini drones for beginners starting at just €99 – for example, the P4 drone. If you want more features, you can opt for the P613 for €149 or the P15 for €299. These models are ideal for beginners on a budget who want to gain their first flying experience. The low prices are achieved by omitting features such as 360° obstacle avoidance or professional tracking modes like ActiveTrack. Piecarté offers compelling deals that make the transition from entry-level to professional models easier.
GPS drones start at around €263.99, like the Potensic ATOM 2, and can reach over €1,000 for professional models. The DJI Mini 5 Pro ranges in price from €729 to €1,019. These higher prices are justified by features such as longer flight times of up to 51 minutes (compared to 31 minutes for cheaper models), larger image sensors (1/1.3 inch), and 360° obstacle avoidance, which significantly reduces the risk of crashes. The price differences reflect the enhanced features and performance of the models.
"The DJI Mini 4K is the affordable choice for beginners... Ideal for holidays – perfect for first flight experiences and price-conscious users."
– hardwarepoint online
In February 2026, Hifi Foto Koch GmbH offered the DJI Mini 4K for €349 – a €90 discount off the original price of €439. This positioned the 4K-capable GPS drone as an attractive mid-range option, ideal for those moving from basic mini-drones to higher-end models. At the same time, the DJI Neo Standalone was available for €149 after a €50 discount, appealing particularly to beginners. Those willing to invest more could benefit from Fly More Combos, such as the DJI Mini 4 Pro for €1,129. Refurbished or refurbished units and special bundle offers also made it possible to access high-end features at an attractive price.
When you should choose which type of drone
Mini drones: For beginners and travel
Mini drones weighing less than 250g are ideal for spontaneous adventures. They fit easily into a jacket pocket or a small backpack compartment – perfect for hikes or city trips. Models like the DJI Neo (135g) or DJI Flip offer features such as palm launch and AI tracking, so you can get started right away, even without prior experience. In the EU, these drones fall into category C0/A1, meaning you don't need a drone license and they can be flown in residential areas with fewer restrictions.
"The mini-series is a very popular content creator tool for solo influencers and small businesses."
– Markus Igel, Photo Koch
For social media fans, mini-drones are almost unbeatable. Their "True Vertical Shooting" mode (9:16) makes them perfect for TikTok, Reels, and Shorts. Their robust construction and propeller guards also allow for indoor flights. Furthermore, they are virtually silent and barely visible from a height of 50 meters.
GPS drones: For outdoor photography and precision work
GPS drones excel in stability and are ideal for landscape photography and precise shots. Thanks to GPS positioning, they hover perfectly in the air, enabling razor-sharp long exposures and precise panoramas. The waypoint function allows you to pre-program flight routes – practical for recurring tasks such as inspections or professional filming.
"Thanks to the integrated GPS, the drone stays as if it were nailed down. This is almost indispensable for panoramas."
– Photo Erhardt
Professional applications range from inspecting wind turbines to identifying diseased trees. Features like ActiveTrack 360° enable the automatic tracking of moving objects such as people or vehicles. The Return-to-Home (RTH) function ensures that the drone safely returns to its starting point in case of signal loss or low battery – with an accuracy of ±0.5 m vertically and ±1.5 m horizontally.
This is how you decide which drone you need
To choose the right drone, you should consider your experience, budget, and intended use. For beginners, models with obstacle avoidance and return-to-home (RTH) functionality are ideal, and these are available starting at around €349. Travelers and vloggers benefit from mini-drones under 250g, as they are portable and don't require additional licenses. However, those who want to take professional-quality shots with larger sensors, multiple focal lengths, or better wind stability should opt for GPS drones.
Prices for mini drones start at around €349, while high-end models like the DJI Mini 5 Pro are available from about €799. Professional GPS drones start at around €989 and can cost over €2,000. Keep in mind that in the EU, a license (A1/A3 or A2) is usually required for drones over 250g. Check local regulations and consider liability insurance, as many private policies do not cover drone flights. With this information, you can choose the type of drone that best suits your needs.
Conclusion
Choosing the right drone depends entirely on your needs: Mini drones offer compactness and ease of use, while GPS drones impress with professional stability. Mini drones under 250g are perfect for travelers, beginners, or content creators, as they are small, lightweight, and, thanks to their EU C0/A1 status, can be used without a drone license. Models like the DJI Mini 5 Pro even combine GPS functionality and high-quality 4K video recording in a handy format.
On the other hand, GPS drones score points with advanced features such as satellite-based technology. Functions like automatic return-to-home or waypoint navigation ensure stable flight performance – ideal for complex outdoor projects.
The difference is also reflected in the price: mini drones are often cheaper, while GPS drones cost at least around €989 and can become correspondingly more expensive with additional functions.
At Piecarté, you'll find the perfect model for you – whether you're looking for portability for spontaneous shoots, professional stability for larger projects, or excellent value for money. Use our detailed product comparisons and legal information to make the right decision.
FAQs
Which drone is easier for beginners to fly?
Mini drones are a great choice for anyone just getting started in the world of drones. Thanks to their compact size and simple controls, they are significantly easier to fly. This not only makes them stable in the air but also less intimidating for beginners.
Compared to more complex GPS drones, mini-drones are much simpler. They forgo many technical features, allowing you to focus on the basics of flying. This lets you gradually familiarize yourself with the controls and behavior of the drone without being overwhelmed by too many functions.
What EU rules apply if my drone weighs over 250g?
If your drone weighs more than 250g, specific EU regulations apply that you absolutely must comply with. These include pilot registration, mandatory insurance, and avoiding no-fly zones. Depending on the intended use and category of your drone, training or even a permit may also be required. Carefully review the applicable regulations to ensure you are legally compliant.
Which functions are most important outdoors (wind assist, return-to-home, obstacle detection)?
Outdoors, wind resistance, return-to-home (RTH) functionality, and obstacle avoidance play a crucial role. Wind resistance helps ensure stable flight even in challenging conditions. With the RTH function, the drone automatically returns if the connection is lost or the battery is low. Obstacle avoidance minimizes the risk of collisions, especially during demanding flight maneuvers. These features offer greater safety and control – ideal for a worry-free outdoor flying experience.